Wing Ribs 14-3-5 to 14-6-1
Wing rib final assembly has begun! I started by riveting the flap hinge ribs and attach brackets to the respective wing ribs. These were all easily done with the pneumatic squeezer and the longeron yoke.
 |
| Flap attachments riveted using the pneumatic squeezer |
I also riveted the torque tube support bracket assembly together with the pneumatic squeezer. Here, pay special attention to the orientation of the angle when riveting it to the torque tube support brackets!
While riveting the left wing torque tube assembly, I accidentally riveted the wrong face of the angle to the bracket (the angle holes still lined up perfectly), but when I test fit the assembly in the inboard wing rib, the holes in the bracket flanges did not line up with the rib flange holes.
To fix this, I had to drill out the 6 universal head rivets holding the angle to the torque tube assembly (no issues here if you follow the recommendations in this video), and rivet the angle in again in the correct orientation.
 |
| Torque tube bracket assemblies riveted together |
 |
| Right wing flap hinge brackets |
 |
| Left wing flap hinge brackets |
 |
| Riveting the torque tube assembly to the inboard rib |
 |
| Left and right inboard ribs with all attachments riveted on |
With the ribs assembled, I then took the right wing spar and clecoed in most of the ribs, the exception being the two most inboard ribs and the outboard rib. Due to the 3 inboard ribs being close together, and facing the same direction, it is easier to rivet each one in separately before placing the next rib in position. Also, the outboard rib is not riveted in at this time, so I left it off to avoid any unintentional riveting.
 |
| Using the leading edge cradles to support the main spar and hold it in position while riveting the ribs. |
 |
| Block of wood used for easier clamping over the flange |
 |
| 12 ribs riveted in, 2 more to go. Note the inboard 3 ribs are positioned and riveted one at a time |
Once the ribs were riveted in, I inserted and torqued the bolts as per the plans. There is limited space to turn wrenches on the rib side, so I used a 3/8" socket on a small 1/4" socket wrench to turn the nut 95% of the way, before switching to the torque wrench to handle the final few turns to the correct torque value of 20-25 in-lbs (+ running torque).
 |
| Rib bolts torqued down with torque seal applied |
I had a small issue bucking one of the rivets in the second most inboard rib flange. While riveting, the rivet gun slid off the rivet head and dented it as the set slid across, also causing a a smaller smiley in the spar web just below the rivet head. To fix this, I drilled out the rivet, scuffed the smiley and primed over the scuffed area. I then riveted again (this time without issue), and other than the visible primer, the mark left on the spar web is barely detectable and doesn't cause any concern for structural integrity.
 |
| Inboard ribs riveted in. The rivet over the primed area was replaced after the first attempt to buck damaged the rivet head. |
Once the third most inboard rib had been riveted and bolted in, I worked on doing the same for the second most inboard rib, followed finally by the inboard rib. Note that the inboard rib uses 2 washers on one of the bolts, which is noted in the plans but can easily be missed!
 |
| Remaining inboard ribs riveted and bolted in place |
 |
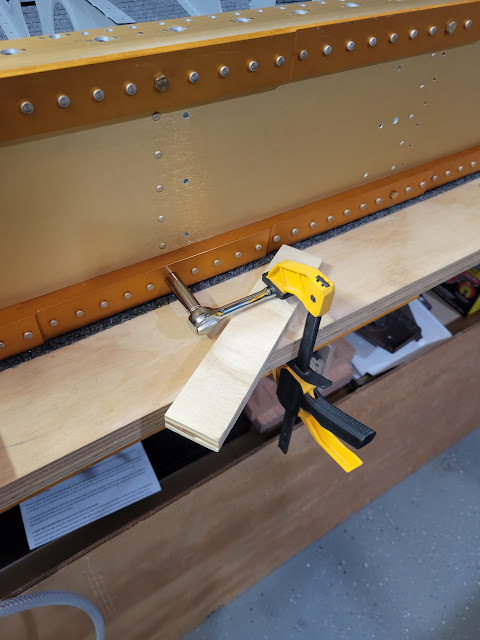
| Clamping down the socket wrench on the bolt head allowed me to focus on torquing from the nut side and made the whole one-man-job process easier |
Once all ribs were riveted and bolted in (except for the outboard rib), I clecoed the rear spar in to provide some stability, and placed the entire assembly aside, so that I could repeat the same on the left wing.
 |
| All 14 ribs riveted and bolted in, and rear spar clecoed on for now, viewed from bottom of the right wing... |
 |
| ...and from top of the right wing |
Build Hints
- Be careful riveting the angle to the torque tube assembly to ensure it is oriented correctly. The holes will line up from either face of the angle, but if the incorrect face is riveted to the torque tube bracket, the bracket flange holes will not line up with the rib holes.
- Do not dimple the torque tube assembly flange holes that attach under the top skin. The top skin is countersunk in this area so those holes don't need dimpling! I accidentally dimpled them earlier, and had to flatten out those two dimples.
- To torque down the nut on each bolt I used a 10" socket extension attached to the torque wrench. This allowed me to move the rib to the side while torquing, enough to allow the socket/wrench to align parallel to the bolt. Without the extension, the torque wrench would have to be very close to the spar web and flanges, and there is very limited room available in that area.
Time Taken: 11.7 hours
Dates: February 28 2024 - March 6 2024
Wing Ribs Total Time: 43.9 hours
RV-10 Build Total Time: 620.1 hours
Priming Total Time: 62.4 hours (not included in build time totals)